Unleash Your Inner Chef: Master the Easy Homemade Fruit Leather Recipe in Your Oven
Remember those chewy, flavorful fruit snacks from childhood? The good news is you can easily recreate that nostalgic deliciousness right in your own kitchen with a simple, wholesome
homemade fruit leather recipe. Forget artificial colors, sweeteners, and preservatives; making fruit leather in your oven is not only incredibly straightforward but also a fantastic way to enjoy a natural, healthy snack that bursts with real fruit flavor. Whether you're a seasoned home cook or a complete novice, this guide will walk you through everything you need to know to create perfect, pliable fruit leather every time.
Why Make Your Own Fruit Leather? Beyond Just a Snack
The appeal of homemade fruit leather extends far beyond satisfying a sweet craving. There are several compelling reasons to embrace this simple culinary art:
- Control Over Ingredients: This is arguably the biggest benefit. You dictate exactly what goes into your fruit leather, ensuring it's free from added sugars, artificial flavors, and preservatives. This makes it an ideal healthy snack for kids and adults alike.
- Nostalgic Delight: For many, fruit leather evokes fond memories of childhood Fruit Roll-Ups. Recreating these at home brings that joy back with a wholesome twist.
- Reduce Food Waste: Do you find yourself with an abundance of seasonal fruit from your garden, a farmers market haul, or just a great sale at the grocery store? Fruit leather is an excellent solution for using up overripe or excess produce that might otherwise go to waste. It's a fantastic way to preserve excess fruit and enjoy its goodness long after its peak season.
- Cost-Effective: Store-bought fruit snacks can be surprisingly expensive. Making your own is far more economical, especially when you're utilizing fruits that are in season or on sale.
- Customizable Flavors: The possibilities are endless! You can experiment with different fruits and combinations to create unique flavor profiles tailored to your taste buds.
Essential Ingredients & Fruit Choices for Your Fruit Leather Recipe
The beauty of homemade fruit leather lies in its simplicity. You typically only need one core ingredient: fruit!
The Fruit Base:
Almost any fruit can be transformed into delicious fruit leather, but some work better than others due to their sugar and pectin content. Here are some top recommendations:
- Berries (Strawberries, Blackberries, Blueberries, Raspberries): These are incredibly popular choices, offering vibrant color and tart-sweet flavors. Their high water content makes them easy to cook down.
- Apples: Often paired with other fruits, apples add natural sweetness and pectin, which helps the leather set and become pliable. Any dessert apple variety works well.
- Stone Fruits (Plums, Peaches, Nectarines, Cherries): These yield wonderfully flavorful leathers. Just remember to pit them thoroughly.
- Tropical Fruits (Mango, Pineapple, Banana): Mango and pineapple create exotic, sweet leathers. Banana can be added for creaminess and sweetness but is best mixed with other fruits to prevent a too-sticky texture.
- Pears: Like apples, pears offer a mild sweetness and good texture.
Optional Additions:
*
Lemon Juice: A squeeze of lemon juice (about 1 tablespoon per pound of fruit) serves multiple purposes. It brightens the fruit's natural flavor, helps prevent browning (especially with lighter fruits like apples), and acts as a natural preservative, extending the shelf life of your fruit leather.
*
Sweeteners: While ripe fruit is often sweet enough on its own, if your fruit is a bit tart or you prefer a sweeter leather, you can add a touch of honey, maple syrup, or sugar to taste. Add this *after* cooking and pureeing, then taste before reducing further.
*
Spices: A pinch of cinnamon, nutmeg, or even ginger can elevate your fruit leather, particularly with apple, pear, or plum varieties.
The Step-by-Step Homemade Fruit Leather Recipe (Oven Method)
This fruit leather recipe utilizes your oven's lowest setting to gently dehydrate the fruit purée, transforming it into a flexible, chewy snack.
Step 1: Prepare Your Fruit
Start by preparing your chosen fruit. Wash it thoroughly. For berries, remove any stalks. For apples, pears, or stone fruits, core them (or pit) and cut them into chunks. There's no need to peel most fruits unless you prefer an ultra-smooth leather and find the skin bothersome – many fruit skins contain beneficial nutrients and fiber. For example, leaving apple or berry skins on contributes to a richer color and nutrient profile.
Step 2: Cook & Soften the Fruit
Tip your prepared fruit into a saucepan. You generally won't need to add any water, especially if using frozen fruit, as juice will release as it thaws. Place the pan over a low to medium-low heat. Cook gently, stirring occasionally, until the fruit softens and starts to break down, releasing its juices. Putting a lid on the pan can help trap steam, accelerating the softening process. The goal is for all the fruit to be very tender and juicy – this typically takes 10-20 minutes depending on the fruit.
Step 3: Purée to Perfection
Once the fruit is thoroughly softened, remove the pan from the heat. Use a stick blender directly in the pan or carefully transfer the cooked fruit to a food processor or blender. Process until completely smooth.
For an exceptionally smooth fruit leather, especially if using fruits with small seeds (like raspberries or blackberries) or tougher skins, consider pushing the purée through a fine-mesh sieve into a clean saucepan. This step removes any unwanted pulp, seeds, or fibers, resulting in a more refined texture, similar to store-bought fruit snacks. While optional, it certainly elevates the final product.
Step 4: Thicken for Faster Drying (Optional, but Recommended)
Return the puréed fruit to a clean saucepan and place it back over a low heat. Cook, stirring frequently (especially as it thickens to prevent sticking), until the purée reduces and thickens significantly. You'll know it's ready when you can pull a spoon through the purée and it leaves a clear path on the bottom of the pan that takes a few seconds to fill back in. This step is crucial because the more moisture you drive off now, the shorter your drying time will be in the oven, saving you energy and time. This concentrated purée also intensifies the fruit flavor.
Step 5: Spread & Dehydrate in the Oven
Preheat your oven to its absolute lowest possible temperature – typically between 150°F (65°C) and 170°F (75°C). Line a large baking sheet with parchment paper, a silicone baking mat, or a reusable silicone tray liner. These liners are essential to prevent the fruit leather from sticking.
Pour the thickened fruit purée onto the lined baking sheet. Using an offset spatula or the back of a spoon, spread the purée into a thin, even layer. Aim for about 1/8 to 1/4 inch thickness. Consistency is key here; thicker areas will take much longer to dry, while thinner spots might become brittle. The purée should look opaque when spread.
Place the baking sheet in the preheated oven. The drying time will vary significantly based on your oven, the fruit's water content, and the thickness of your spread, usually ranging from 4 to 8 hours. Check on it periodically.
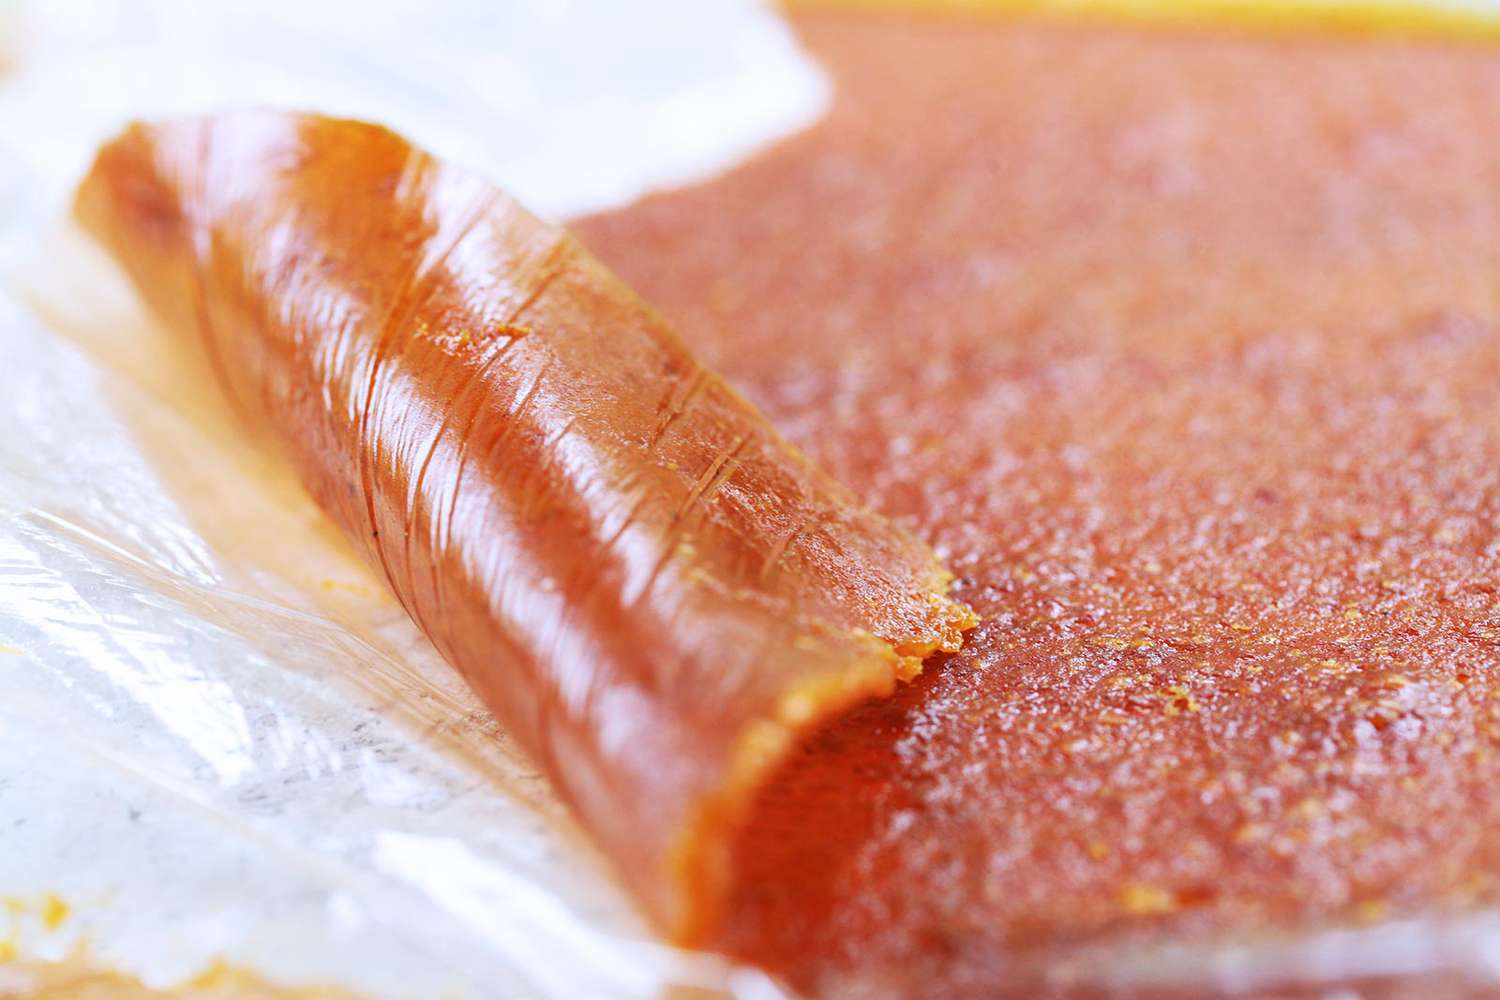
Step 6: Cool, Cut & Store
Your fruit leather is ready when the surface is no longer tacky to the touch and it feels firm but pliable, like a piece of soft leather. It should peel away from the liner easily. If it's still sticky, continue drying. If it cracks when you try to peel it, it might be slightly over-dried, but it's still edible!
Once fully dried, remove the baking sheet from the oven and let the fruit leather cool completely at room temperature. This is important as it will firm up further as it cools.
Once cool, peel the fruit leather off the liner. You can then cut it into strips, squares, or roll it up tightly. A pizza cutter or sharp knife works well for cutting. For easy storage, you can roll the entire sheet up and then cut it, or cut strips and roll them individually with parchment paper between them to prevent sticking. Store your homemade fruit leather in an airtight container at room temperature for up to 2-3 weeks, or in the refrigerator for longer.
Tips for Fruit Leather Success
*
Consistency is Key: Spreading the purée to an even thickness ensures uniform drying. Use a measuring spoon to scoop purée and spread, or simply practice for an even layer.
*
Monitor Your Oven: Ovens can vary widely, especially at low temperatures. Some older ovens may struggle to maintain such low heat. Consider using an oven thermometer to ensure accuracy. If your oven's lowest setting is higher than 170°F, prop the oven door open slightly with a wooden spoon to allow some heat to escape.
*
Don't Rush It: Patience is a virtue when making fruit leather. Low and slow is the motto to ensure proper dehydration without cooking or burning the fruit.
*
Add Lemon Juice: Don't skip the lemon juice unless you're confident your fruit is super sweet and you plan to consume the leather quickly. It truly enhances flavor and preservation.
*
Storage Savvy: Always store fruit leather in an airtight container to prevent it from absorbing moisture from the air and becoming sticky, or drying out further and becoming brittle. Layering with parchment paper is a great trick for preventing pieces from sticking together.
*
Experiment with Blends: Don't be afraid to mix and match fruits! Apple and berry is a classic, but try mango and pineapple, or strawberry and banana. Each blend offers a unique flavor and texture profile.
Embracing this easy fruit leather recipe is more than just making a snack; it's about reconnecting with whole foods, reducing waste, and enjoying the simple pleasure of creating something delicious and healthy from scratch.
Conclusion
Making homemade fruit leather in your oven is a rewarding culinary adventure that brings wholesome goodness and nostalgic flavors right to your fingertips. This simple, adaptable fruit leather recipe allows you to transform fresh or frozen fruit into a naturally sweet, chewy, and satisfying snack, free from artificial additives. By following these straightforward steps and incorporating our helpful tips, you'll be able to create perfect batches of fruit leather that are not only delicious but also a smart way to enjoy and preserve the bounty of nature. So, gather your favorite fruits, preheat your oven to its lowest setting, and get ready to indulge in the pure, unadulterated taste of homemade fruit leather!